Yellow cupcakes with peanut butter cream cheese frosting and chocolate ganache
 Egg whites are back! To finish out the series I started before I took that whole gluten and dairy break, I’ve got one more piece of the science and a home-run recipe for you. To learn more about how egg foams work and how to use whipped egg whites in all sorts of yummy desserts, check out the earlier posts: meringues, a pavlova, and your very own marshmallow fluff.
These cupcakes with the longest name ever are also known as birthday cupcakes for the baby. And before you give me any grief about giving all sorts of refined sugar and whatever else to an infant, the baby in question is my little sister, who is 19. I guess nicknames are the price you pay for being the spoiled youngest.

The baby came out to Chicago to visit for a few days on her way home from college, so obviously we had to bake together. It had been her birthday the week before–smack dab in the middle of finals. No good. And no cake, which is unacceptable. Having hooked her on the idea of peanut butter cream cheese frosting, we built these cupcakes around that topping. The end result is a sweet, springy yellow cupcake topped with plenty of frosting, and of course some ganache to round it out because you can’t have a birthday in my house without chocolate.
I can’t tell you enough how great this frosting is. For something based on peanut butter and cream cheese, both pretty heavy, it’s amazingly light and fluffy. If you’re skeptical about the flavor combination, I’m not sure we can be friends. The tang of the cream cheese balances the peanut butter perfectly–seriously, this stuff is addictive. And the rest of the cupcake isn’t too shabby either. A basic yellow cupcake gets a lift from browned butter and whipped egg whites, and the chocolate ganache makes the whole thing super decadent. It’s the perfect treat to celebrate someone special. And don’t forget–if it’s their birthday, they get to lick all of the spoons.

We’ve talked a lot about whipping egg whites and how the proteins create a matrix that makes this beautiful, delicate foam. That’s great and all, but we really need to heat them up to give them any sort of useful lifetime. You may have seen meringue pies that “weep,” and it’s not because they’re really upset that you’re about to cut them into pieces and shove them into your mouth. The egg proteins form a scaffolding for the foam, holding together the liquid from the whites and the air bubbles that make it so fluffy. But the overconfident proteins think they’re much stronger than they are, so as time goes on they lose their grip on each other, the mesh gets some holes in it, and you see liquid puddling out of the meringue.
The heat sets the proteins in place through coagulation, something you know about if you’ve ever fried an egg. Think about the white through that process: it starts out basically clear and liquid, then gradually turns opaque white and solid as it cooks. As the proteins get hot, they unravel (we call it denaturing) and get all tangled up together in what we see as the solid white. If you’ve been paying attention, you’ll realize that creating the egg foam also relies on denaturing proteins–what does the heat bring that the whipping doesn’t?

It’s really all about just one protein, ovalbumin. It makes about half of the egg white proteins and, significantly, doesn’t respond to whipping. This means that when you whip egg whites, you make a foam with the rest of the proteins while ovalbumin hangs around and does nothing, much too cool to join the protein scaffold. Stick the foam in the oven, though, and you’ll get this wallflower to join the party. It coagulates around 180 degrees F, so when the foam hits that point, it gets a huge boost in structural integrity as all of that ovalbumin denatures and adds stability. With the heat also evaporating water from between the proteins, baking egg foams really firms them up and allows you to keep them for a day or two (like marshmallow fluff) or even much longer (like meringue cookies).

Yellow cupcakes with peanut butter cream cheese frosting and chocolate ganache
This ideal special-occasion cupcake combines all of my favorite flavors while remaining perfectly light and fluffy. The peanut butter cream cheese frosting melts in your mouth, the cupcake brings a delicate sweetness, and the chocolate ganache pulls it all together. Whipped egg whites are folded in at the very end of the cupcake, giving it an extra airy boost.
Yield: 24 cupcakes
Yellow cupcakes
6 T. butter
6 eggs, separated
1 c. white sugar, separated
2 T. vegetable oil (or other neutral oil)
1 c. buttermilk
1 T. vanilla
1 ¾ c. + 2 T. flour
2 T. cornstarch
½ c. brown sugar
¼ t. baking soda
¾ t. baking powder
½ t. salt
Peanut butter cream cheese frosting
1 c. creamy peanut butter
5 oz. cream cheese, room temperature
4 oz. (1 stick) butter, room temperature
2 c. powdered sugar
¾ t. salt
Chocolate ganache
¼ c. heavy cream
2/3 c. dark chocolate chips or 4 oz. dark chocolate, chopped
Yellow cupcakes: preheat the oven to 350 degrees F. Line 24 cupcake wells with paper liners or grease them well.
To brown the butter, place it in a small pot over medium heat until it melts, bubbles, and has brown flecks on the bottom. It will start to smell nutty and delicious when it is done. Let cool.
Whip 4 egg whites with an electric mixer at medium speed until bubbly. Slowly add ¼ c. white sugar and whip at high speed until medium peaks form. The tips should fall slightly when you lift the whisk but should not form a closed loop.
Combine the browned butter, oil, buttermilk, 2 whole eggs, 2 egg yolks, and vanilla in a large bowl. Mix together.
In a separate bowl, mix all of the dry ingredients. Stir the flour mixture into the butter mixture just until combined. Gently fold in the egg whites in three parts.
Fill prepared pans with cupcake batter, filling each well about ¾ full. Bake for 15-18 minutes, until the top of the dome feels firm and springs back when you touch it.
Peanut butter cream cheese frosting: with the paddle attachment of a stand mixer or an electric beater, beat the peanut butter, cream cheese, and butter until combined and light in color, about 1 minute at high speed. Add the powdered sugar and salt and beat on low speed until combined. Beat at high speed for an additional 30 seconds. Transfer to a pastry bag (you can use a decorative tip if you want, I just cut the tip off of my bag).
Chocolate ganache: heat the cream in the microwave or over gentle heat. When hot, add the chocolate and stir constantly until the chocolate melts and the mixture is smooth. Let cool.
Assemble the cupcakes: spread a layer of ganache on the top of the cupcake. Pipe a spiral of frosting over the ganache, leaving a ring of chocolate visible on the outside. Give to your favorite birthday girl and enjoy together!
Cupcake recipe adapted from Smitten Kitchen and The Science of Good Cooking from Cook’s Illustrated. Science, as usual, from McGee.

Marshmallow fluff and Baileys s’mores tart

This is the third installment in a series all about egg whites. To catch up on how egg foams work and make chocolate-hazelnut meringues, go here. For more on the role of acid in egg foams and a recipe for blood orange pavlova, go here.
You know how everyone in the world starts any instructions for whipping egg whites with a strongly-worded warning about the dire consequences of getting even a speck or a smidgeon of fat into your foam? I’ve seen advice to throw out all of your whites if a yolk breaks while you’re separating the eggs, and I even warned all of you against using a plastic bowl to beat your meringue for the pavlova in case it’s holding on to traces of the deadly stuff. You’d think with all of the reading of egg-white-based recipes I’ve been doing lately this important tip would have sunk in.
Apparently not.

I was really excited to make marshmallow fluff at home, even more so when I was inspired to add a little Baileys–sounds delicious, right? And many meringue recipes call for alcohol for flavor, which means the internet thinks it’s a good idea. So my egg whites are whipping up beautifully, starting to hold their shape, and I throw in the magical Baileys.
Everything collapses. The delicate peaks revert to liquid. I’m pretty sure all hope is gone, but I keep whipping for a little while just in case. Nothing. I looked again at the secret ingredient that betrayed me–Baileys Irish Cream. Oh right. Turns the two tablespoons of Baileys that I’d used to punch up the flavor added more than four grams of fat to the delicate foam.

So this week, as a lesson to myself and to prevent all of you from similar heartache, we’ll be exploring the effects of fat on whipped egg whites. It comes down to the basic kitchen principle that oil and water don’t mix. We’ve all seen a vinaigrette separate in its bottle, and this is the same idea.
I’ll leave the details of why oil and water don’t get along to another day and for now just stick to what this does to egg foams. We already know that an egg white foam has two parts: water from the egg whites and air bubbles introduced by all of the whipping. We also know that proteins unravel, interact with each other, and hold these two pieces together. One of the reasons this works has to do with the distinction between fat-like and water-like groups. Proteins are ginormous by molecular standards, so they’re big enough to contain both. The water-like areas are perfectly content to hang out in the watery bits of the egg foam, but the fat-like sections want none of that and flock to the air bubbles to get away from the water. The long proteins have a foot in both worlds so they bridge the water and the air, holding the bubbles in their matrix.

When a fat molecule comes along, it wants in on the air bubble space too. The proteins share their valuable real estate, so now some of the air-water border has proteins and some has fat. Unlike the proteins, though, fat is very one-dimensional and doesn’t have any water-like areas to connect it to the water part of the foam. The fat becomes a bridge to nowhere, clustering around the air bubble without tethering it to the water. As more fat takes up space around the air bubbles, it leaves less room for the fat-like sections of proteins, cutting off the bridge between air and water and making the foam collapse.
Moral of the story: you have to add Baileys to your marshmallow fluff in a different way.

Marshmallow fluff and Baileys s’mores tart
Like a Swiss meringue, this marshmallow fluff starts by whipping egg whites and sugar over heat to partially cook the whites for stability and food safety. I paired with a simple graham cracker crust and a chocolate ganache–both spiked with Baileys!–for an easy St. Patrick’s Day-inspired treat. The fluff is also perfect with peanut butter (I may have had a fluffernutter pancake last week, it may have been amazing) and makes an excellent frosting.
Yield: one 9-inch tart plus about 2 cups extra fluff
Marshmallow fluff:
3 egg whites
¾ c. sugar
½ t. cream of tartar
¼ t. salt
1 t. vanilla
Graham cracker crust:
1 sleeve graham crackers (9 sheets)
5 T. butter, melted
2 T. Baileys
Baileys chocolate ganache:
½ c. heavy whipping cream
1 c. dark or semi-sweet chocolate chips
1 ½ T. Baileys
1 t. coconut oil
Make the marshmallow fluff:
Combine the egg whites and sugar in the bowl you’ll whip them in (your upright mixer bowl or another metal bowl if you have a handheld mixer). Place the bowl over a pot of boiling water to create a double boiler and make sure the water does not touch the bottom of the bowl. Heat, stirring continuously, until the mixture is frothy and steaming.
Using an electric mixer, quickly start to whip the hot egg whites on medium speed. Add the cream of tartar, salt, and vanilla. Increase to high speed and continue to whip until the mixture is thick enough to hold its shape and the bowl feels cool.
Make the graham cracker crust:
Preheat the oven to 350 degrees F. Butter a 9-inch cake pan (or a tart pan, if you have one of those).
Crush the graham crackers in a food processor or with a plastic bag and a rolling pin. In a large bowl, mix in the melted butter and Baileys. The mixture should look like wet sand and should hold together when you pinch it. If it seems too crumbly, add another teaspoon or two of butter.
Press the mixture into the prepared pan. Bake until the top has lost its sheen and the edges brown slightly. Let cool.
Make the Baileys ganache:
Heat the cream in the microwave until it steams, using 30-second increments (it took four in my microwave). Add the chocolate chips and stir until melted. While it is still warm, stir in the Baileys and coconut oil.
Assemble the tart:
Spread the ganache over the top of the graham cracker crust, leaving a thin border around the outside. Spoon marshmallow fluff onto the middle of the tart and use a warm offset spatula or the warm back of a spoon to spread it out and create swirls and peaks. To brown the fluff, place it under the broiler for a minute or two, keeping a close eye on it and rotating it if necessary.
Fluff recipe adapted from Bon Appetit, ganache adapted from Life Tastes Like Food.

Blood orange pavlova

It’s egg whites time! We’re doing a series on this versatile and pretty scientifically amazing ingredient. If you missed the first post, go here to read about why you can whip eggs into billowy peaks and to get the recipe for delicious chocolate hazelnut meringues.
I made a tester pavlova (meringue base only) earlier this week and immediately fell in love with the delicate snap of the shell paired with the marshmallow-y tenderness inside. It’s like eating a cloud, people.
And it turns out clouds are delicious.

But this cloud also had a full cup of sugar and none of the fruit on top that helps redeem the finished product, so I nibbled at it, decided it was too delicious to keep around for long, and told my roommate to try it before I hid it from myself in the trash can. He took a bite and forbade me from throwing it out. When I came back from work the next day, it was gone. And that’s just the base of this amazing dessert: we’ll cover it with whipped cream and douse it in orange sauce and oranges before we’re done, because that’s just what we do.
The cloud relies on the same science as the meringues from the last post; in fact, it’s basically just a bigger version of the little cookies. Since you’re all already experts on the basics of egg white foams, today we’re going to tackle an ingredient that shows up in many meringue and pavlova recipes: cream of tartar. Yes, it is good for something other than snickerdoodles. In this case, its acidic properties create the optimum pH for your cloud.

The key to creating a perfectly stable foam lies in the interconnected web of egg proteins that bridges the water in the egg whites with the air, holding all those beautiful bubbles. If the proteins get too cozy with each other, though, they bond together too tightly and become as exclusive as the in-clique from a teen movie. Instead of stabilizing the air and water in a cohesive foam, the proteins hold on to each other for dear life and shut out everything else as your painstakingly whipped fluff collapses.
The proteins can bond with each other in a number of ways (which you can read about in detail here), but the one we care about right now is sulfur bridges. Some proteins have sulfur atoms almost free to interact with the world, protected only by a lonely little hydrogen (we show this as an S-H group, for sulfur and hydrogen). But hydrogen is a fickle friend, prone to wandering away and leaving the sulfur lonely and looking for new companions. It likes to stick to its own kind, so given the opportunity, it will latch on to a similarly bereft sulfur atom on another protein and form a long-lasting and close-knit friendship. Or a strong bond, if we’re talking chemistry. Lots of these sulfur-sulfur (S-S) bonds pull the egg whites too close together and break your foam–not good.

To prevent that, we need to make sure that the hydrogen atoms stick with their sulfur buddies instead of taking off and leaving the sulfurs open to bonding with each other. Pumping up the concentration of hydrogen in the surrounding solution does that in two ways. First, a hydrogen atom bonded to a sulfur atom is less likely to split, keeping the original S-H bond intact. Second, if a hydrogen does hit the road, the lonely sulfur atom is more likely to meet a different hydrogen before it encounters a sulfur, creating a new S-H bond. By maintaining the S-H bonds and preventing the S-S bonds that strongly link different proteins together, extra hydrogen protects your egg foam from over-whipping. Luckily, “extra hydrogen” is really just another way to say “acidic,” so all we have to do is add some sort of acid to get this benefit. Cream of tartar, a powdered acid, is the most common in the US, but vinegar, lemon juice, and other acids give you the same effect.
Pomegranate-orange pavlova
This is essentially a delicious cloud, covered in whipped cream, topped with blood orange sauce and orange segments. It’s just as heavenly as it sounds. Although there are three parts, they come together fast and the toppings can easily be assembled as the meringue bakes. Make sure to use a clean, non-plastic bowl for whipping the egg whites to prevent pesky fat molecules from ruining your foam.
Yield: one 8-inch pavlova, serves about 8
Meringue:
4 egg whites
½ t. cream of tartar
¼ t. salt
1 ½ t. cornstarch
1 c. sugar
½ t. vanilla
Zest of ½ blood orange
Whipped cream:
¾ c. heavy cream
1 T. powdered sugar
½ t. vanilla
Blood orange sauce:
4-5 blood oranges
½ c. sugar
½ t. cornstarch
Assembly:
1 orange (blood or navel)
Make the meringue:
Preheat the oven to 250 degrees F. Line a baking sheet with parchment paper and grease it lightly.
Using an electric mixer, whip the egg whites until bubbly. In another bowl, mix the cream of tartar, salt, cornstarch, and 1 T. sugar. Add this mixture to the egg whites. Continue whipping as you slowly add the rest of the sugar, beating until the fluff reaches medium peaks. Add the orange zest and vanilla, and whip until stiff peaks form.
Use a spatula to spread the meringue into a circle about 8 inches in diameter on the baking sheet. Create a shallow well in the center for the toppings. Bake for 90 minutes, checking every half hour for browning. If you see color on the edges, reduce the oven temperature to 225. After 90 minutes, the outside should feel firm when you touch it. Turn off the oven, prop it open with a wooden spoon handle, and let the meringue cool completely.
Make the whipped cream:
Whip the heavy cream to soft peaks. Add the powdered sugar and vanilla, and continue to whip to stiff peaks.
Make the blood orange sauce:
Juice the oranges until you have 1 cup of juice. Mix the cornstarch and sugar in a small pot and the juice. Heat until boiling, stirring constantly, and boil for one minute. Let cool.
Assemble the pavlova:
Supreme the orange: cut off the top and bottom so that you see orange flesh (not just pith). Place the orange on one of its cut ends and remove the zest and pith from the outside with vertical cuts. To remove each segment of orange, cut along the inside of the skin separating the segments and pull out the flesh. (For step-by-step pictures, check out this article.) Pull the segments into smaller pieces.
Spoon the whipped cream into the middle of the meringue base. Sprinkle the orange segments on top, and drizzle with blood orange sauce. Serve immediately.
Meringue recipe adapted from Smitten Kitchen and Foodstyle. Science courtesy of McGee.

Chocolate hazelnut meringues

Good morning, students, and welcome to the first day of Egg Whites 101.
Didn’t realize you’d gone back to school? Don’t worry, I’ll give you plenty of warning before the midterm. Plus, this is the kind of class with lots of sugar and even some chocolate, which is the best kind. Here’s the deal: instead of me reading up on some aspect of food chemistry and then feeling the need to tell you ALL OF THE THINGS about, you know, gluten or sugar or something in one fell swoop, we’ll stick to one topic for a month or so and tackle one piece of the science at a time. And you’ll still get a new recipe with each post! Have an idea for a future subject? Let me know!
First up, egg whites. Mostly because they’re just really really cool. I love how Harold McGee puts it: “Thanks to egg whites we’re able to harvest the air” (On Food and Cooking, 100). As a devotee of eggs for breakfast, either poached or fried, I mostly encounter egg whites as the firm and sometimes crispy counterpoint to the rich runniness of yolk. On my breakfast plate, the yolk is the clear winner, but the white definitely holds its own in the sweet treats department. Its defining feature is the ability to be whipped into stable foams, which give us pillowy meringue pies, rich souffles, fluffy pancakes, and melt-in-your-mouth meringue cookies. For something that’s 90% water, that’s pretty amazing.

Basically, a foam is just air pockets suspended in a liquid of some sort. Aficionados of cappuccinos or lattes love the familiar sight of milk foam on top of espresso, and meringue uses the same principles. Egg whites yield a much more stable product, though, because of the way their proteins interact with each other and with the air. The proteins in an untouched egg white exist mostly as compact, intricately folded balls with little interaction between them, while a foam relies on these same proteins as long, unraveled threads that tangle together and trap air inside their network. Think of neatly coiled balls of yarn versus the knotted mess that a pet or a small child can make out of a knitter’s closet. The former is very self-contained, while the yarn web will ensnare unwary toys and toes, like the air bubbles in whipped egg whites.

As your whisk whips through the unsuspecting egg whites, it pulls the folded proteins out of their compact shapes. They slowly enlongate and begin to interact with other lengthening proteins, forming bonds that connect the separate strands and build on an emerging network. The action of the whisk continues to introduce new air bubbles and unfold proteins, strengthening the foam from bubble-bath delicate to a stiff meringue that holds its shape.

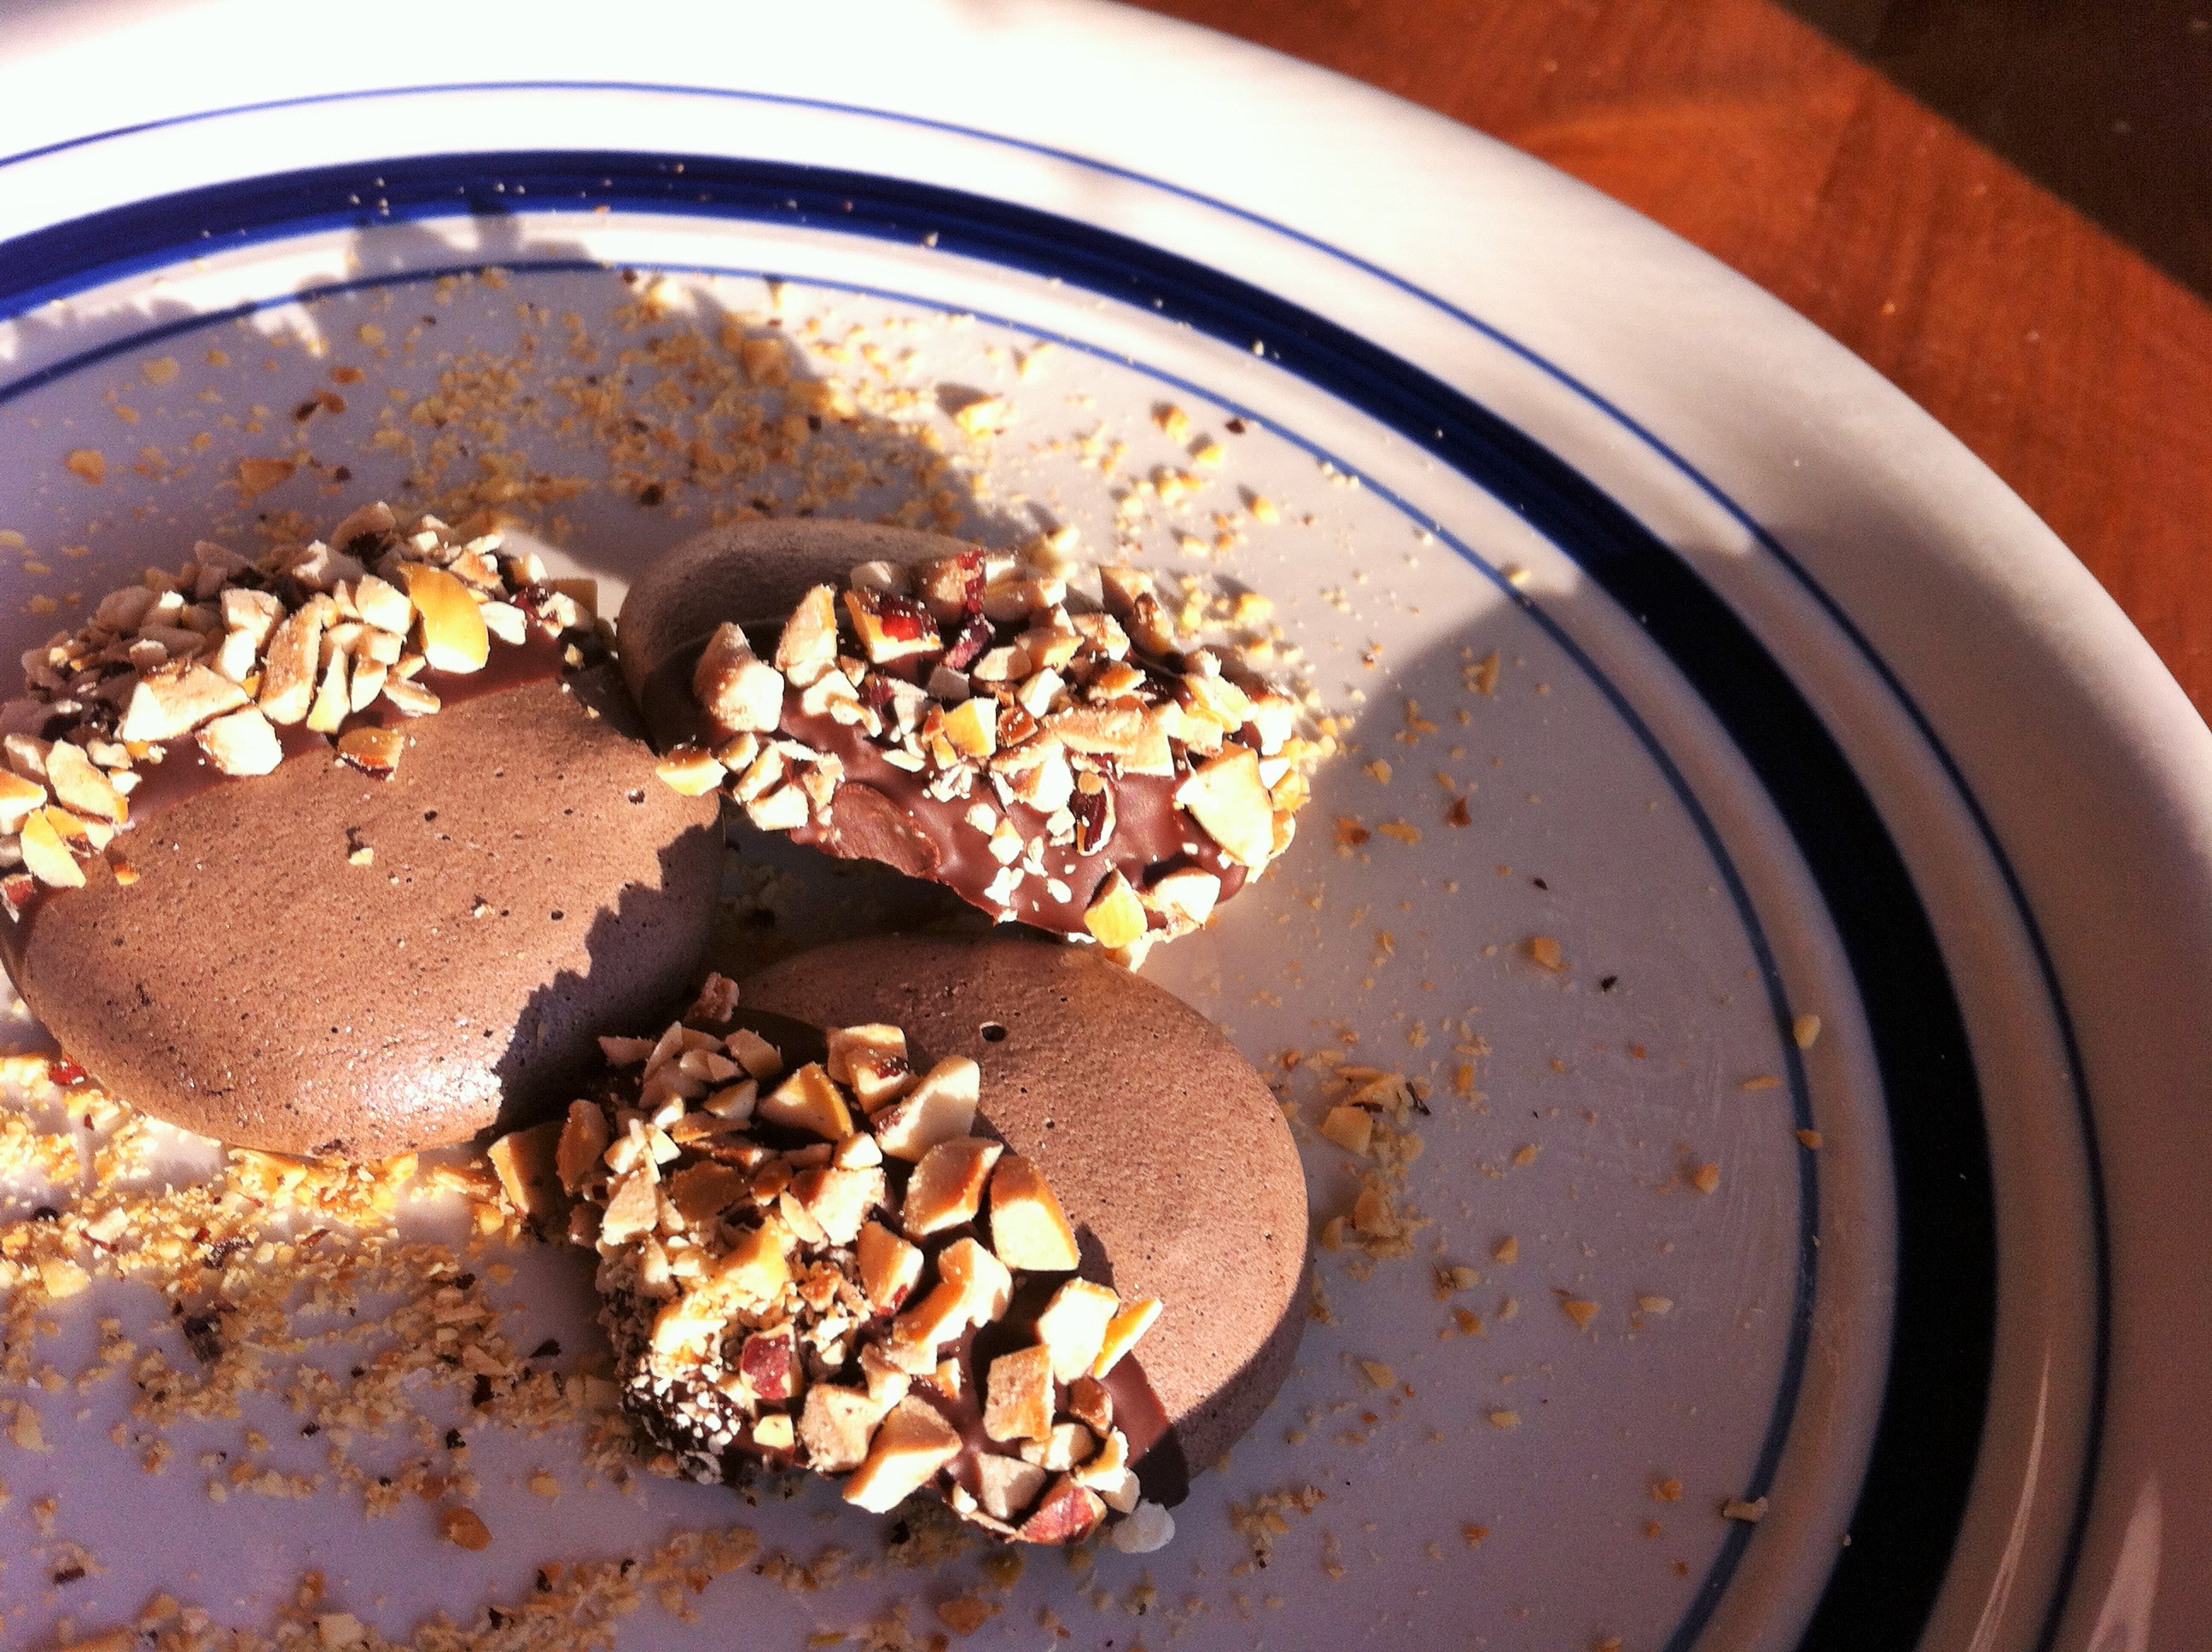
Chocolate hazelnut meringues
These light, crispy cookies still pack a strong chocolate punch. Delicately crunchy, they melt in your mouth for a smooth burst of flavor. Grinding the sugar may seem like an unnecessary extra step, but it makes it dissolve more easily into the egg whites and gives you a better finished product.
Yield: about 60 1-inch cookies
3/4 c. plus 1 T. sugar
3 egg whites
1/4 t. cream of tartar
1/4 t. salt
3 T. cocoa powder
1 t. hazelnut extract (available in the baking section of most grocery stores)
Chocolate chips and toasted hazelnuts, optional
Preheat the oven to 200 degrees F. Line a baking sheet with parchment paper.
Grind the sugar in a food processor for about one minute. Set aside.
Using an stand mixer or electric hand mixer, beat the egg whites until bubbly. Add the cream of tartar and salt, then gradually add the sugar while whipping. Beat the egg white mixture until it is thick, shiny, and holds its shape on the beaters.
Add in the cocoa powder and hazelnut extract, and mix until combined.
Transfer the meringue to a pastry bag with a large plain or star top. Pipe the cookies onto the prepared baking sheet and bake for 2 hours. Turn the oven off and leave the cookies in the cooling oven to finish cooking.
If you want to jazz up your cookies, dip them in melted chocolate chips and roll in crushed hazelnut.
Recipe adapted from The Kitchn and Not So Humble Pie. Science, as usual, based on McGee.